Planting and growing pepper seedlings in a snail


To get a rich harvest of cucumbers, you need to choose high-quality seeds, grow seedlings, prepare the soil, fertilize on time and take care of the plant. Seedling pepper in a snail is a special method. Let's consider its description.
Growing pepper seedlings in a snail
Method advantages
- During cultivation, seeds are less likely to suffer from diseases, which allows the grower to obtain and plant seedlings of the highest quality.
- The technique allows you to observe and control the germination of seeds, therefore weak (poorly developed) and painful shoots will be rejected even at the stage of the first shoots.
- Mold poses a particular danger to seedlings; planting peppers in a snail helps to control moisture levels in the soil. If the grower takes proper care of the plant, it will not hurt with a black leg.
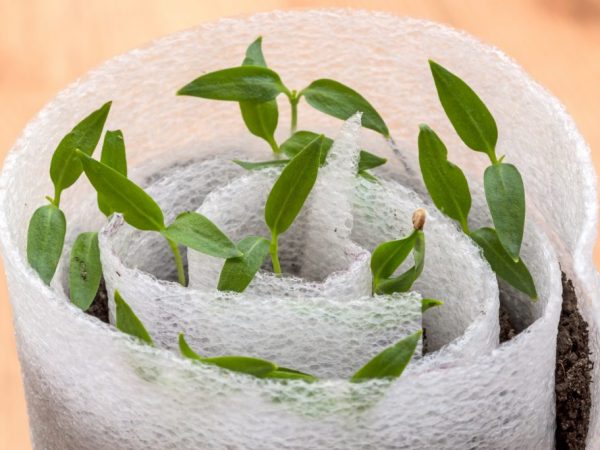
- Planting pepper in a snail saves space, in one such roll with a diameter of 20-25 cm, you can produce up to 90-100 sprouts.
- When growing seedlings from seeds, picking occurs with minimal damage to plants. Since the snail itself unfolds easily, you can get seedlings from it without disturbing the root system.
- You can make a snail from scrap materials. If the cultivation process is carried out as carefully as possible, they can be reused.
There is also one drawback: if the soil is excessively flooded with water or the seedlings do not have enough light, the seedlings are pulled out, which reduces the quality.
What is needed for manufacturing
Growing and planting peppers for seedlings in a snail is within the power of absolutely everyone. To proceed directly to sowing, the grower needs to prepare the following materials:
- Substrate. It is good if it is made of porous polypropylene, since this material is environmentally friendly and safe. The optimum thickness is 2 mm.
- Two-layer toilet paper.
- A container filled with water.
- A soil mixture, there are certain requirements for it: it should not contain foreign impurities, therefore, it can be sieved before use. Next, the soil is moistened to a state where it is held lumpy with a hand clenched in a fist.
- A rope or elastic band for securing (money is ideal).
- A spray bottle or small syringe (these are handy for watering).
- A film or bag is needed to create a greenhouse effect.
- Tweezers for easier planting.
- The container in which the rolls are placed. To do this, use plastic containers (buckets, trays).
- Sawdust, they create the right microclimate, helping to remove excess moisture.
- Fertilizers, if necessary.
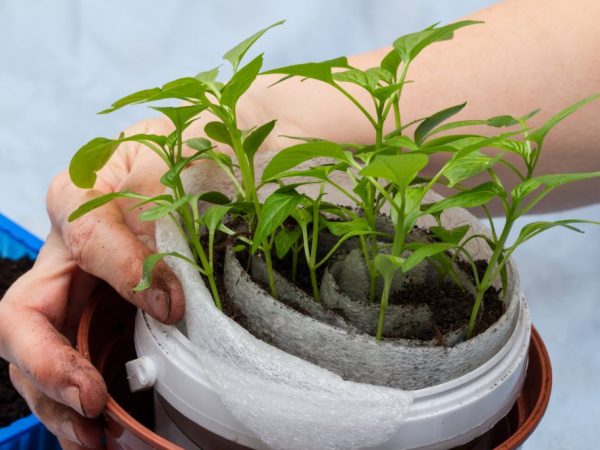
Comfortable and compact fit
Stages of creation
Stage 1
Initially, a substrate is prepared (width - not less than 15 cm, not more than 17-18 cm). The strip is laid out on the work surface. Two-ply paper is laid out along the length of this piece, but it is positioned so that the top edge of the backing material is 1.5 cm higher. This criterion determines the sowing depth of the seed. Toilet paper is moistened with water and fertilizer is added.
Step 2
For the further process, the gardener needs tweezers, with its help the sowing (laying) of the seed is carried out. From the beginning of the strip itself, a small indent of 3 cm is made and the seeds are spread with a distance of 1.5-2 cm. After the end of the procedure, you need to roll up the substrate as carefully as possible, starting from the side of the layout.
It is important to remember here: if a vegetable grower uses different varieties, it must be borne in mind that the seeds have different germination times, respectively, when evaluating the germination parameter, incorrect results may be obtained.
Step 3
"Snails" are placed in a container (container) with the seeds facing up, covered with a film (bag) on top to maintain a constant moisture level. The container is moved to a warm place. The first checks are carried out in a couple of days. If everything was done correctly, the seeds will form plant loops on the 3-5th day. Further, it is unwound and underdeveloped sprouts and seeds that have not sprouted are removed. So that the place is not empty, new ones are placed there.
Step 4
The previously prepared soil mixture is scattered over the width of the piece of the substrate, the width of the layer is no more than 1.5 cm.This is necessary so that the sprouts receive more complete nutrition. The soil is slightly compacted and irrigated with water. The structure is again wrapped and secured with an elastic band or rope. It is not worth pulling too much, so as not to disrupt the nutrition of the root system. A little soil mixture is added on top.
Step 5
Sawdust is poured at the bottom of the container. During the development period, the seeds need good lighting, so they choose the right moment and set the container. After the appearance of the first cotyledon leaves, the shelter is removed from the container. This is done gradually so as not to harm the young shoots.
Care consists in proper watering. The structure is watered in the upper part, but only until the roots develop, a syringe is excellent for watering. As they develop, they switch to root watering.
Conclusion
Planting seeds and growing peppers using the Kerimov method is easy and simple. The main thing is to know the landing technology. Many have already said goodbye to seedling boxes, because, having tried sowing pepper in a snail, they appreciated all the advantages of this method.