How to build a warm chicken coop for the winter: simple instructions


The dream of any poultry farmer is for chickens to fly all year round. A warm winter coop can stimulate birds to lay eggs year-round. Consider how to build a good utility room with your own hands.
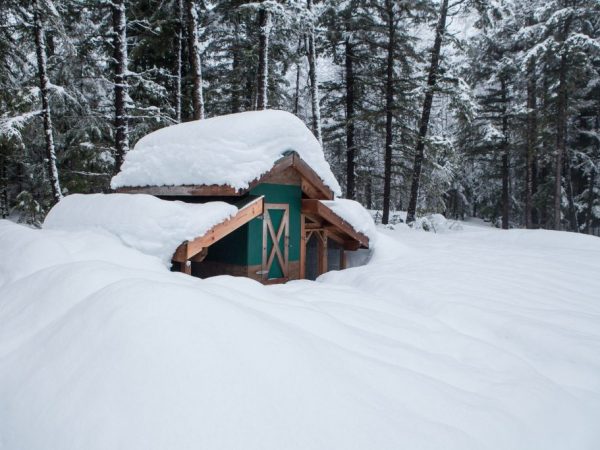
How to build a warm chicken coop for the winter
Warm chicken coops options
There are several budget options for designing insulated winter chicken coops.
Some are quite possible to create with limited resources, time and money.
The simplest version is considered to be a semi-dugout with an outer part of 50-100 cm.
The above-ground part is built of glass on the south side (birds also need natural light), and on the remaining three sides, walls can be installed from any building material that can withstand an embankment from the ground.
Permitted construction on the basis of a wooden frame, which is sheathed with plywood or chipboard.
There must be insulation inside (thickness according to climatic conditions). From above it needs to be covered with a second layer of plywood or chipboard.
But a poultry house made of thick wooden beams does not need additional insulation. But it is more profitable to choose not immediately the specific shape of the chicken coop, but to correctly determine what materials will be useful during construction.
Material selection
The minimum price for a self-built farm facility for winter keeping birds is 20,000 rubles.
When using expensive resources, it can increase up to 40,000-200,000 rubles.
For the foundation
There are 3 options.
- Tape. It is poured inside the henhouse perimeter lined with beams. This type is quite expensive because it takes a lot of material.
- Columnar is considered the most budgetary and lightest. Implies columns of brick or reinforced concrete dug into the ground. It is on the posts that the supporting structures should fit.
- Pile belongs to the middle price category. The bottom line is that metal pins are screwed into the ground at a distance of one meter from each other using special equipment. Already the frame of the chicken coop is attached to them.
For walls
A small chicken coop for the winter can be built from blocks, bricks, shell rock and wood.
- Blocks (from 1890 rubles per cubic meter) do not harm the health of birds and do not limit the space. In addition, it will be possible to mount quickly;
- Shell rock (from 200 rubles per square meter) is a hard limestone characterized by poor thermal conductivity (this is the quality that makes it a suitable material for a winter home). It is convenient to build small poultry houses for 25-30 heads from it;
- Brick (from 4374 rubles per cubic meter) has a low thermal conductivity, so it is convenient to use it. And its durability makes it one of the most demanded materials in auxiliary construction. Combines well with styrofoam.
The material for the roof is not critical.It is really possible to build it from construction corrugated board, metal tile or slate (the choice should depend on the price and how it fits into the general appearance of the site).
The main thing in the roof is its moisture resistance. Therefore, an ordinary roll insulation is considered a good alternative. It is allowed to lay out the walls with expanded clay slabs.
Drawings can be made by hand: there are no generally accepted requirements for either slope or shape.
For insulation
Insulation is necessary to fill the gaps between the external and internal walls (usually this distance does not exceed 15 cm).
Mineral wool, foam rubber, polystyrene, as well as pressed straw are suitable for this.
At the moment, foam is considered the most successful material for increasing the density of walls.
Cotton wool should be used in a wooden chicken coop (this will reduce the risk of fire). It is proposed to shield it with foil for greater heat preservation.
Preparatory work
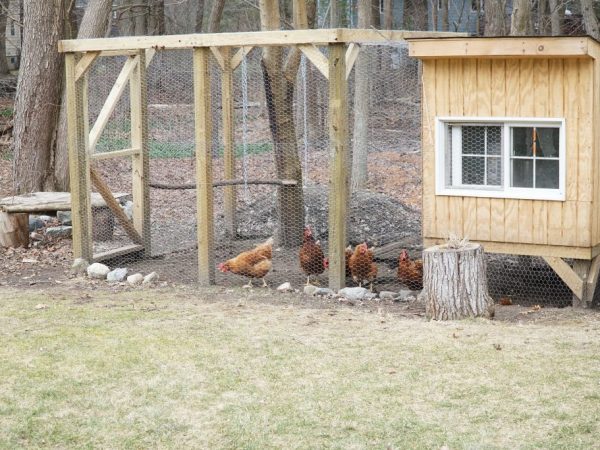
Do-it-yourself chicken coop
First of all, you need to remember the rule: the width of the foundation should slightly exceed the thickness of the wall. And this is not due to the rules of construction.
The wall should be installed in the center of the foundation, because it will provide additional protection from the invasion of rodents and from the negative effects of moisture.
You can almost completely eliminate the risks of pests by increasing the height to 30 cm, there is also an option to raise the chicken coop on concrete pillars of 25 cm, or to dig metal sheets around the perimeter.
Remember other rules when building.
- To provide natural light in winter, it is necessary to locate windows under the roof on the south side.
- It is important to check the quality of the frames: no draft is allowed.
- To protect themselves from the already cold air, the chickens cuddle together as tightly as possible. Therefore, the area must be calculated taking into account the following: there will be from 4 to 7 birds per 1 sq. M, up to 3 birds for the beef breed, and 2.5 m will be enough for 10 heads for layers.
- It is also worth considering how and where to make a small vestibule. It is needed in the winter road between the front door and the main bird space to provide chickens with additional protection from drafts and snow.
It is important to calculate what items will be needed to create a poultry house. It is customary to include a construction project with accurate drawings and calculations, building materials for creating formwork and pouring a foundation, locksmith tools, as well as building materials listed in the previous paragraphs.
How to do it yourself
First, mark the foundation (sticking wooden pegs in the corners and then connecting them together with a rope can help).
Along with this, it is necessary to outline the perimeter of the bird walking area. It is important even in winter.
Base
Dig a small trench up to 45 cm deep under the base of the chicken coop for the winter. Crushed stone and a layer of sand are poured into its bottom, which will create an opportunity for the building to settle.
The total thickness of the two layers should not exceed 10 cm.
Next, the formwork for pouring is mounted (the upper edge is necessary to level the concrete that has not yet hardened). The height of the wooden structure must correspond to the future foundation.
Inside the formwork, you need to lay the reinforcement, then everything is poured with concrete. After leveling and the formation of the so-called cement milk, you need to cover everything with a film.
Water for seven days to avoid cracking. After 20 days, the base will become relatively strong, and after 28 days the mixture will finally solidify. When this happens, a waterproofing layer is laid on top and the creation of the floor and frame begins.
Floor
It is advisable to clear the space that you want to cover with floor cladding from the top layer of soil.
In its place, river sand and expanded clay should be tamped (it will take on the role of insulation). On top of it, you need to lay a mesh, make a screed from cement mortar 2 centimeters thick.
For the next few days, while the screed hardens, do not forget to water it with water (here, as with the base, this procedure prevents the formation of cracks in the concrete).
Experienced farmers suggest making the screed at an angle: this will facilitate cleaning in the chicken coop.
Frame
Before starting to design the frame of the winter chicken coop, you need to determine the shape of the roof slope.
The architectural value is not so important, therefore it is most rational to make a lean-to. From this it follows that one wall should be slightly higher than the others, and the top of the side walls has the same angle of inclination as the future roof.
Construction will begin with laying the timber on the foundation and then securing it with anchor bolts. The bars are traditionally connected to each other by metal plates.
In the corners of the frame, vertical beams are installed, calculated depending on the length of the roof slope. They are attached to the lower ones.
The upper horizontal belt of the chicken coop is attached to the vertical bars in the same way.
Outside, it is worth covering the frame with small bars. This will noticeably increase the density of the structure and its stability, as well as simplify the application of the insulating material. With a bar it is necessary to form window openings and small entrance doors for birds. Do not forget to put sturdy roof rafters on top.
Roof
You need to insulate the entire chicken coop
A crate made of plywood sheets or small boards is nailed to the laid rafters.
On top of the layer obtained, a film for vapor barrier or polyethylene is laid, which improves heating of the poultry house. It needs to be overlapped, and the resulting seams are glued with adhesive tape.
Next, a thermal insulation material and a waterproofing layer are laid out. Through all additional layers, transverse strips are nailed to the crate.
It is important to correctly determine their dimensions and the distance between them. This is influenced by the appearance of the final roof covering.
- If a soft material is used (for example, roofing felt), then it is better to lay another layer of plywood or chipboard.
- If conventional slate is used, additional timber roof cladding is not required.
As soon as the roof sealing work is completed, it is necessary to do the insulation of the walls and floor, it is also easy to do it yourself.
Insulation of walls and floors
The frame of the hen house is twice treated with an antiseptic, from the outside are attached bars 20 * 20 cm in length and width. Wooden sheets of OSB type are attached to them using self-tapping screws 50 mm long (the step between them should be 20 cm).
In the space formed between the sheets, an insulating material is placed (i.e. a vapor barrier membrane fixed with a stapler). Then comes mineral wool in slab or roll format. The material should fit snugly against the wood base.
The process of insulating the floor or roof of the house is similar. Everything is laid under the floorboards or rafters, respectively. Two seals can be placed on the floor (winter floor temperature directly affects the physical condition of males and layers). But remember that there should be small gaps in the material during the roof sheathing process. This will improve ventilation of the chicken coop. Holes will also form when bypassing door and window openings, but it is important to fill them with polyurethane foam.
Lighting
The structure of the poultry house must include windows. They are usually placed under the ceiling to reduce heat loss during the frost season.
It is better to install a triple glass unit - it will reduce the flow of cold air to a minimum. For the safety of the livestock, it is also worth attaching a protective net.
But there are few windows to maintain the required level of lighting. There should be at least 14 light hours from December to February.
In addition, artificial lighting devices, located low, will play the role of heaters.
Ventilation
The house has an excellent humidity level of 65%, deviating from this negatively affects bird performance and health.
To achieve the desired performance, you can put a large container of cold water.
An important step in arranging a chicken coop is considered to be ventilation. And to increase it, it is proposed to hang a powerful infrared lamp in the center. It has an excellent drying effect and does not harm either hens or young growth.
If you do not want to use traditional methods, install a real electric fan (but it can be difficult to conduct enough powerful electricity into the chicken coop).
Or make the device yourself. To do this, a plastic pipe is mounted in the ceiling and carried one meter up from the roof. This will allow natural air currents to form.
It should be installed at an angle to prevent snow from entering the house.
Some craftsmen make dampers to interrupt ventilation in case of frost.
Making roosts
Perches are traditionally created from a wooden beam with a cross section of 4 * 4 cm or 6 * 4 cm. It is important to grind off all sharp corners and give the pieces of wood a cylindrical shape so that the birds can comfortably hold onto them.
If you are not ready to try so hard, find relatively even branches with the same dimensions in the forest or park, they are not inferior in quality to homemade ones.
The distance between adjacent perches in width should exceed 30 cm, and in height - 20. Be sure to attach a ladder to the lower one.
How to care for a chicken coop after winter
After winter, it is necessary to carry out a general cleaning in the room. It is important to clean all bird roosts, nests, nets, doors and windows from accumulated dirt with a stiff brush.
A 2% solution of caustic soda will help to clean the surfaces and disinfect (the liquid is quite caustic, therefore, protective equipment must be used in its manufacture).
Next - rinse everything with soda ash diluted in hot water. The room should be ventilated and dry for 300-360 minutes.
With this care, a warm chicken coop will last for many years.