Bunker feeder for chickens - do it yourself


Breeding chickens is a responsible activity that requires the construction of a chicken coop and the provision of conditions for keeping poultry. First of all, it is necessary to equip the power supply and water supply systems. If there are a lot of individuals and they are of those breeds that are often eaten, then a bunker feeder with a continuous supply of food is considered the best option. With such an organization, the feed is loaded once a day into the grain compartment, and the metered amount will be fed into the chute. It is not necessary to buy a finished product; it is easy to build it with your own hands from materials and tools available on the farm.
Bunker feeder for chickens
Description of construction
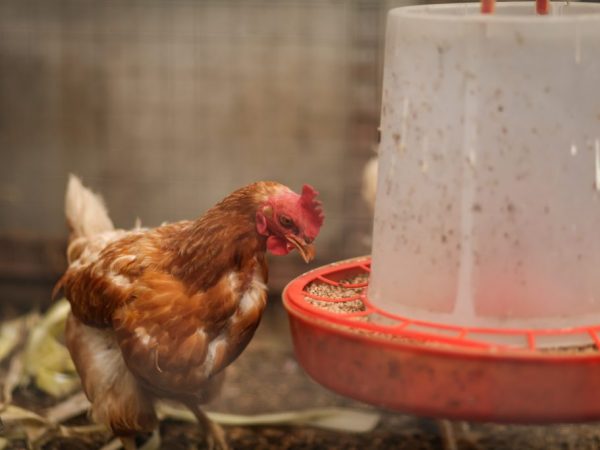
The bunker feeder for chickens is extremely simple - a large-volume bunker is mounted on top, and a grain tray connected to a common outlet is located under it. Feed intake occurs as the bird eats it and, if correctly calculated, is replenished no more often than once a day.
The structure must have a secure container so that birds do not get inside looking for food.
The hole for feeding the feed should not be made more than 5-10 cm, it is important that it slams tightly or is no more than 10 cm in diameter.
To create the structure, plastic pipes, buckets, bottles or cans, wooden plates and boards, plywood are used. Fastened with self-tapping screws, bolts or glue for wood, plastic.
Advantages and disadvantages
You can highlight the main positive qualities of bunker feeders.
- Cleanliness in the chicken coop or feeding area. Due to the fact that grain or other food is not scattered over the territory, and also is not raked by a bird from the tray, there is a minimum of garbage around.
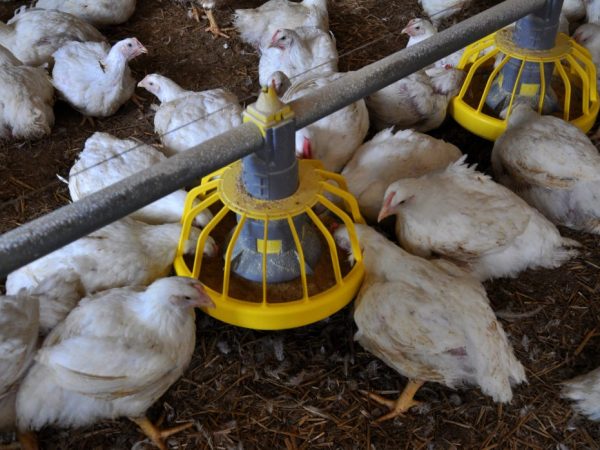
- The frequency of service does not exceed 1 time in 1-3 days. This significantly reduces labor costs and simplifies the care of the hens. Some breeders make feeders so large that they only need to apply feed once a week. But this is good only if the humidity level in the chicken coop or other microclimate factors cannot spoil the food product.
- For each specific case (number of birds, breed, room shape, etc.), there are many design options, both in terms of volume and material of manufacture and shape.
- Cleaning and cleaning of products is greatly simplified, since removable models provide free access even under the feeder, and stationary models have few hard-to-reach places with the correct location.
IMPORTANT: You need to fall asleep as much feed as the birds can eat in 1-2 days for their normal development. This will prevent spoilage of grains or other food products, as well as prevent obesity.
The product also has a number of disadvantages that must be taken into account.
- If a breed is kept that is prone to overeating, then the unlimited supply of feed will significantly spoil their health. It is known that this particular type of poultry does not know the boundaries in food.Chickens peck as much grain as they find or receive from the owner. It is best to install these feeders only for chickens. There is also the option of arranging a special dispenser or timer that determines the portion and time of serving food in the tray, but this will significantly increase the complexity of the design and its cost.
- If grain or food is freely available, it attracts various rodents and various pests. It is necessary to constantly check the chicken coop for cleanliness so that the livestock does not suffer from cellular microorganisms or other harmful pathogens.
- Any deviations from the microclimate (for example, increased humidity or additional dampness) can provoke food spoilage, including rotting. Requires constant cleaning of trays from residues before placing a new portion in it. Rotten or rotten food is dangerous. Checking for unpleasant odor or mold, fungal deposits and other signs of storage problems will help determine the presence of such problems.
How to choose the right one in the store
The variety of feeders is great
Many models and types of poultry feeders can be found on the shelves today.
They differ in price, design and material, as well as in size and other characteristics. However, to choose the best option, you need to know a few rules.
What to look for:
- The material must be durable, and the product itself must be stable. If about 20-50 kg of grain is poured into the box, then the walls must withstand such a load. Also, under the weight of the chickens, the feeder should not tip over, otherwise they may be injured.
- All materials used for construction must be environmentally friendly and harmless.
- The sizes are selected so that at the same time all the livestock have access to food, and the strong individuals do not push back the weaker ones. For straight trays: 10-15 cm per bird or 7-10 cm per chicken. For a circular one: 2.5 cm for a chick or 5 cm for an adult hen.
- The volume of the bunker is made so that the feed poured inside is sufficient for the entire livestock throughout the day.
- When cleaning and disinfecting boxes, trays and other components, no difficulties should arise.
- It is important that the food is evenly distributed. For this, there are special devices or turntables inside, and before the food goes out, there are corresponding protective sides.
- The manufacturing company or country is not always the main criterion, since you can get to a fake or defective product. It is best to rely on your own feelings.
- The shape of the tray should be as safe as possible: no sharp corners or small parts, no closely spaced gaps or holes. Birds in the process of feeding often try to push each other away, jump from above or scratch the food, so following these rules will save them from injury.
How to build with your own hands
The hopper feeder has a very simple principle of operation: the feed chute is flat and wide, and the hopper has only a small access to the chute so that the gravity of the feed spills out as much as fits in the container.
Therefore, you can design a device with your own hands from various materials at hand, including plastic bottles, canisters or even an ordinary bucket.
Made of wood
The simplest wood construction is a single stage feed hopper with a bottom chute. For its construction you will need:
- pieces of solid boards or plywood, one side at least 30 cm long;
- a pair of hinges and self-tapping screws, suitable in diameter (from 3.5 cm, depending on the thickness of the selected boards);
- for measuring and drawing work, you need a tape measure or a metal ruler, a pencil;
- an electric drill for drilling holes and a set of different diameters of drills for wood;
- for cutting wood - a saw or a jigsaw;
- it is more convenient to screw in self-tapping screws with a screwdriver, but an ordinary screwdriver "on a cross" or with cross bits and a ratchet mechanism will do;
- so that the device does not have roughness or other traumatic protrusions, you will need sandpaper for wood.
Simple feeder
- Make a simple drawing: a bottom with a size of 30x17 cm, side walls 40x25 cm and 40x30 cm, respectively, a front wall from one part 70x30 cm and 29x30 cm, a cover 26x30 cm and a back wall 40x30 cm.
- After applying these parameters to the material (plywood or end-to-end boards), carefully cut out each element using a saw or jigsaw.
- Make holes with an electric drill in the places where the parts are attached. A drill is selected that is almost equal in diameter to the used fastening screws.
- Sand all end parts and front surfaces with sandpaper so that they do not pose a danger to the bird.
- Self-tapping screws need to fasten the entire structure so that it is tightly pressed against each part. According to the dimensions shown in the drawing, the angle between the front and rear walls is approximately 15 °.
- On the back wall, above and behind the cover, fasten the hinges so that the box can be easily opened and closed.
- To extend the service life and preserve the properties of the feed in the future, it is worth applying antiseptic agents to all elements.
IMPORTANT: Do not use paints and varnishes, as over time they can flake off and get into the food of birds.
Trough-shaped feeder
- Depending on the number of chickens on the farm or the dimensions of the materials available, the drawing may be different along the length of the trough itself. The optimal bottom size is 100x15 cm. The side walls should be 8x100 cm and 8x15 cm with a triangular projection of 10 cm, which is a pentagon with straight walls. Additionally, you will need a beam with a cross section of 2x3 cm and a length of 100 cm.
- On the prepared wood or plywood, all elements must be applied with a simple pencil in accordance with the dimensions. Then they are cut along the lines.
- Holes are made in the attachment points with a drill with a thin drill.
- Surfaces are sanded with sandpaper and treated with antiseptic preparations.
- All parts are being assembled.
IMPORTANT: Due to the open structure, it will be necessary to keep it under a special canopy to prevent moisture from entering the feed.
Two-story feeder
- For the lower tier, it is necessary to draw a bottom 50x26 cm, side parts 26x35, back wall 50x35 cm, front 25x26 cm.
- For the second tier, you will need 2 elements of 50x10 cm with side walls of a triangular shape with sides of 10x10 cm. It should be attached to the ends of the first and fold back on hinges.
- All operations for sawing the material, grinding it, drilling holes for fasteners are performed in the same way as for the types described above.
From a plastic bucket
Perhaps this is one of the easiest and cheapest ways.
- Choose a dense plastic bucket made of durable material, check the integrity of all walls and bottom.
- Find a suitable 6-section bowl.
- In the bucket, opposite each section, it is necessary to make semicircular holes 2x3 cm in size. In this case, the bottom cannot be damaged, since it must hold back the food.
- Attach the bowl to the bottom of the bucket with a bolt and nut and tighten firmly to ensure a secure fixation of the structure.
- Food is poured into the bucket from above, then it is tightly closed with a lid so that birds cannot get inside the container.
IMPORTANT: It is best to choose buckets that were left after construction or finishing work.
From plastic bottles
Feeding troughs from improvised means
Convenient and inexpensive feed attachments are obtained from large 20 liter plastic bottles.
The main disadvantage of this design is the open top, which requires a special canopy or protection from stranger birds. Can only be used indoors.
Manufacturing instruction
- Two identical plastic containers are prepared, completely free of foreign matter.
- The first one is cut to a height of 30-35 cm from the bottom, the upper part is removed, and in the lower part 6 holes with a diameter of 10 cm are made symmetrically in a circle. It is necessary to retreat from the bottom by about 3-4 cm so that the food does not spill out.
- From the second bottle, the bottom is cut off or a hole with a diameter of 15-20 cm is made, so that it is convenient to fill in the food.
- In the first container, a bottle with a neck is installed and fixed by hands so that the distance between the bottom and the neck is 0.5-0.7 cm. This is necessary for uniform and gradual pouring of food. If this condition is violated, then it will not spill out, and if large, it will fill the container too much.
- Grain is poured into such a structure from above as the bird eats it.
IMPORTANT: One of the main advantages of these feeders is that there is no need to look into the hopper to see how full it is. Also, the plastic does not deteriorate from moisture, it is easy to clean.
Out of the pipe
Tee design
Would need:
- sewer pipe, from 1 m long and 10-15 cm in diameter;
- PVC plugs of the same size;
- tee with a middle outlet at an angle of 45 °;
- a saw for metal or a cutter for plastic.
Instructions:
- The pipe must be cut in a ratio of 7: 2: 1 or use a ready-made length.
- Place a plug on one end of a 20 cm pipe.
- Fit the tee with the side bend up;
- Insert a 10 cm long pipe into the side part as far as it will go.
- The third hole, located vertically, connects to a 70 cm pipe, which is plugged with a plug.
- Fastening must be done using special mounting rings for PVC pipes or metal wire to the wall.
IMPORTANT: One such container, 1 m high, is enough to meet the daily needs of 30 layers or 15-20 broilers.
To prevent bacteria, debris or other foreign objects from entering the feed, at night such a structure should be closed with another plug.
Cutout design
Select a pair of pipes in a length ratio of 6: 4 or 5: 3 depending on the number of livestock. If the pipe is selected with a diameter of 10-15 cm, then an elbow and a pair of plugs should be of the same size.
To work with the material, you will need a jigsaw and a drill. A core drill for concrete can be a good helper.
Instructions:
- On a long pipe of 50 or 60 cm, draw several holes with a diameter of up to 7 cm, located at a distance of 7 cm between the edges to each other.
- You can cut holes with a jigsaw, make a hole in one place with a drill, and also use a special core drill with a victorious coating to simply cut out circles.
- Close one end with a plug, and connect the knee to the other.
- A smaller tube, 40 or 30 cm long, will be attached to the end of the knee, into which the food will fit. The end of this hopper must be closed with a plug.
- The filling frequency is approximately 1-2 times per day.
IMPORTANT: It is not necessary to make many individual round or rectangular holes in the aft tube. The same effect will be when differentiating it into 2 large cavities. In addition, this method will greatly facilitate the cleaning and maintenance of the PVC pipe feeder.
From the canister
You will need an old canister, tin plate measuring 20-25 x 60-70 cm, 3-4 brackets.
You need to choose the simplest tool - metal scissors, a screwdriver, a stationery or wallpaper knife.
- Place the canister on its side, with the wide side down, cut a hole from above with a diameter of 20-25 cm.
- Roll up the pipe from the sheet metal, fasten with rivets. Place it in the hole made so that about 05, -1 cm remains to the bottom.
- The pipe must be rigidly attached to the canister using brackets in this position.
- Along the perimeter on the sides, make holes with a diameter of about 10-15 cm and a frequency of 5-7 cm between each.
- The feed is poured from above through a tin pipe.
IMPORTANT: To protect against debris and birds entering the hopper, you can equip the feeder with a special cover.
Out of the CD box
The simplest and easiest in execution is a product from a regular bowl and container from discs. Oh but great for chickens.
- It is enough to make holes in the container on the sides up to 1-1.5 cm high and 2-3 cm wide.
- Add food, cover with a bowl with a diameter of up to 25-30 cm.
- The structure is neatly turned over, and the feed is evenly and gradually poured out.
IMPORTANT: To make it easier to place such a bunker, you can cover it with a sheet of paper, turn it over on a plate, and then simply remove the sheet from under the container.
Summing up
Bunker feeders for chickens are specially designed to ensure that the birds receive feed on time, without any effort on the part of the breeder.
The main thing that you should pay attention to when choosing such a product is its reliability, environmental friendliness and safety.
You can do everything yourself, this will significantly save money.